Web Design and Development
Tutorial 3 - Images and links
This is the third page of a full Portfolio. This Portfolio will help you prepare for the tutorial test that will count towards your final Coursework mark.
Task 1 - Create/structure the Web Page content
Download Tutorial3_startup.html, open it in the text editor of your choice, and in a browser. Notice that the browser does not recognise the documents structure. Save the file on your home h: drive as tutorial3.html
Important Notes: - No space in the filename
- File must have the .html extension
The web page you create should resemble Fig.2 below. To achieve this, follow the steps outlined below:
- Use appropriate HTML tags to establish the correct structure for an HTML document. Begin by defining the document as HTML and create the basic structure with a head and body.
- Create the appropriate head tags, Tutorial 3 for the title.
- The top of the page contains a navbar. Use an HTML unordered list
<ul></ul> to structure the links for (Tutorials, University Work, Web Stuff, Social Media). Later, we will use CSS to style the list horizontally. These links at the top will act as anchors to the categories on your page. (Note: if you are not using the startup file, you will need some length on your page for the anchors to work). We will create the links later.
- 'My Useful Links' as the page heading.
<h1></h1>
- Notice that the page content is composed of subheadings constisting of:
- Heading, you can use
<h2></h2> for this heading.
- Subheading
<dl></dl>
- Some descriptive text related to the subheading.
- You need to create a description list for this. Consult description lists in the lecture notes for this type of a list.
- Add small decorative images
<img src=""> before the headings, as in Fig.1. You can use the provided support images or look for some on the web (e.g. https://www.iconfinder.com/).
- At a decorative image at the bottom of the page next to the "Back To The Top" text" text.
Make sure you cater for accessibility on your page by using alternative text in the image attribute alt="Add some alternative text."
Important Note: You must ensure you comply with the image license agreement.
- Create a ruler acting as a separator at the end of the document
- Your email address inside an address element
- The last modified date (just as hard coded date), use the
<sup></sup>HTML tag to create Superscript text formating.
The content of the page should look similar to Fig.2 at this stage.
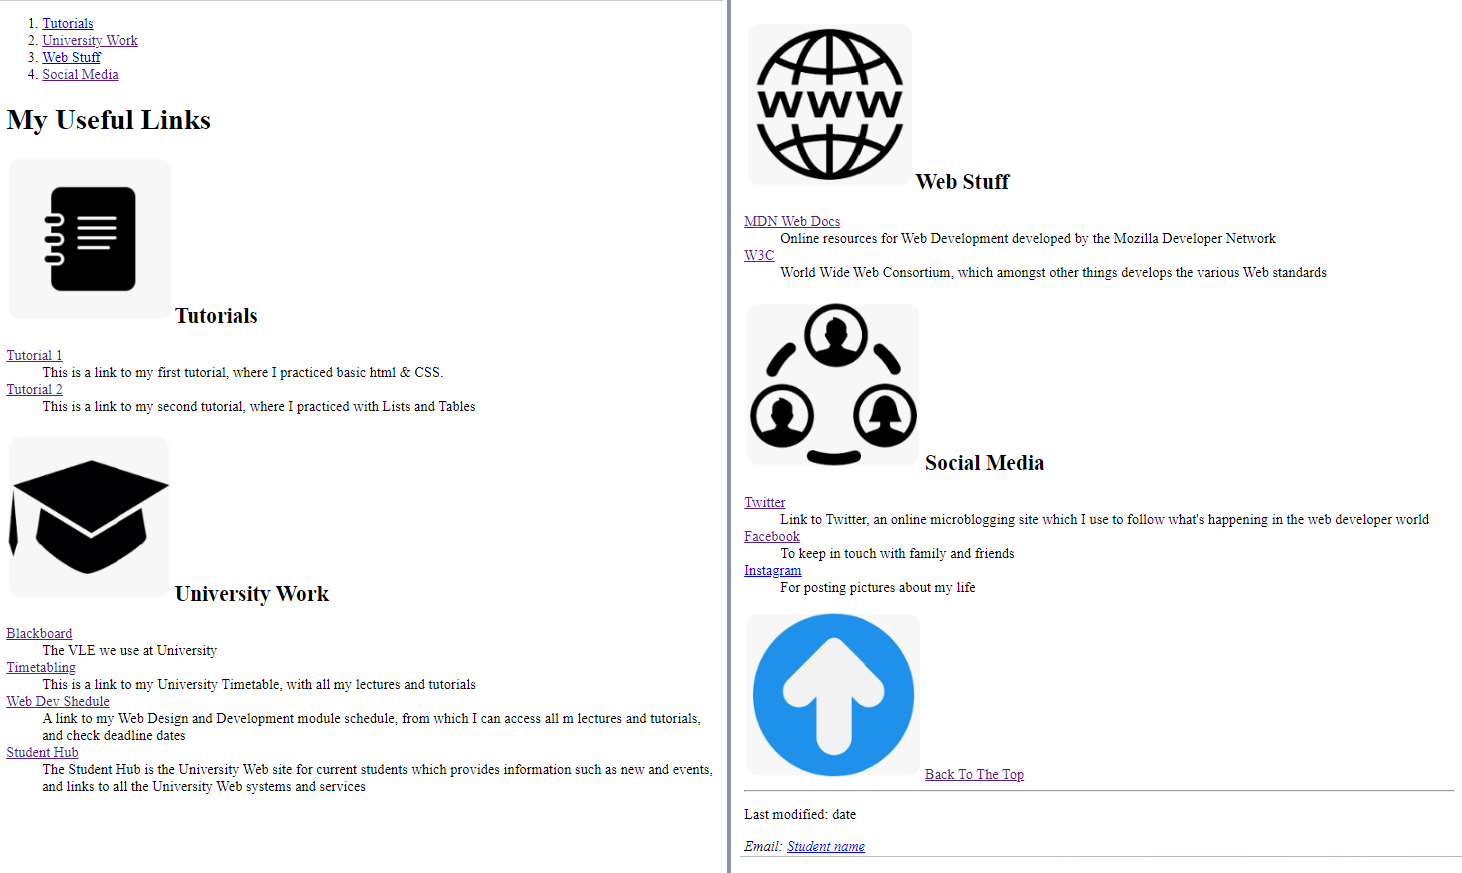 Fig.2 - A snapshot of the page layout without formating with CSS.
Task 2 - Create Links
The page should contain a series of links:
- The navbar at the top of the page contains links to corresponding subheadings. Define the headings "Tutorials", "University Work", "Web Stuff", "Social Media" as anchors and create links from the navbar to the corresponding headings in the page content,
<h2 id="Name"> </h2>
<a href="#ID_Name"> </a>. (Note: if you are not using the startup file, you will need some length on your page for the anchors to work).
- The subheadings under Tutorials are internal links to files within your portfolio folder, specified with . These are relative links, and it is recommended that you organize your website (in your case, this could be the module website or your portfolio website) with relative links. So, when you are working locally and you transfer the entire folder to the web server, all internal links and content should work as intended.
- Use appropriate anchor target attributes so that the links from those headings open corresponding content as separate pages.
- _blank: Opens the linked document in a new tab or window.
- _self: Opens the linked document in the same frame or tab.
- _parent: Opens the linked document in the parent frame.
- _top: Opens the linked document in the full body of the window.
- The subheadings under University Work, Web Stuff, and Social Media are external links
<a href="The URL of the page"> </a>. Use appropriate anchor target attributes so that the links from those headings open corresponding content as separate pages.
- Add a back to top link (hint: you want to link back to your starting <h1> tag)
If you've reached this far, you should be proud of yourself for having worked that hard! You are not done though, you still need to style the page.
Task 3 - Format the page
Important Notes: -
Use an embedded or external style sheet and do NOT use inline styles.
Use embedded style sheet to further modify the HTML content to resemple the example layout of Fig.1 :
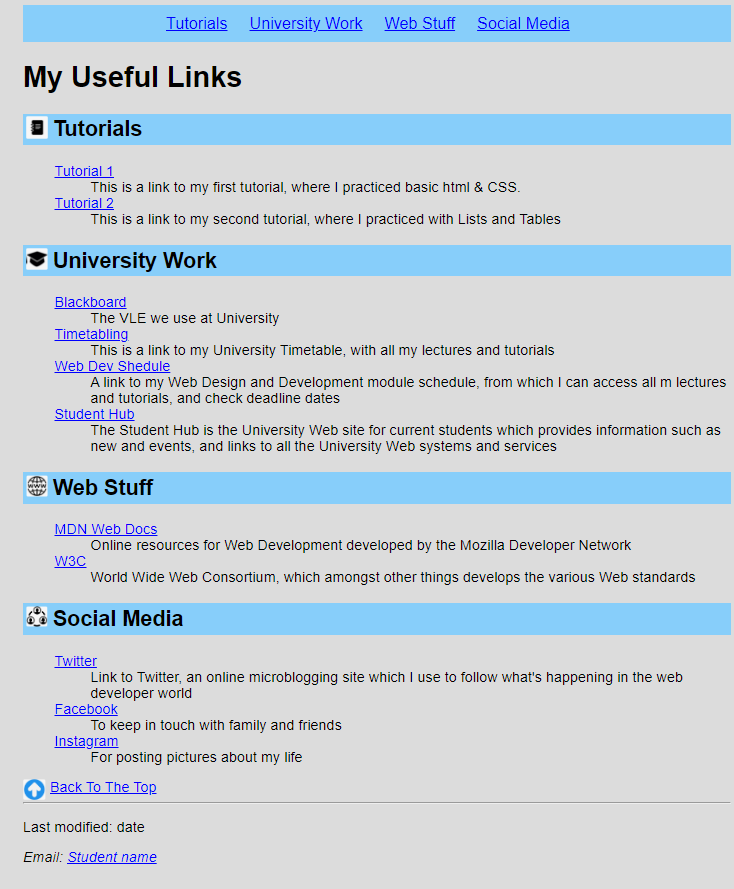 Fig.2 - A snapshot of the expected layout for tutorial 3.
Proceed on the following formating:
- change the document background colour to
background-color: Gainsboro;, or specify a colour you prefer
- document text to
font-family: Arial, sans-serif;
- h2
padding: 3px; to create the wide blue box around the heading, and background-color: LightSkyBlue; , or specify a colour or width of your choice for the heading box
- set the image
width: 25px; and add some space between the image and the heading by changing the padding attribute padding-right: 5px; , experiment with float: left;, and float: right;
- turn the ordered list to a navbar by targeting the ordered list items and set the attribute
display: inline;
- use Link pseudo-classes to define different styles the page links, and the link states unvisited, visited, hovered, active
Now your page should look pretty simmilar to Fig. 2.
Task 4 - Create a Fixed Horizontal Navigation Bar
- Use fixed positioning so that the list of anchor links at the top of your page is a horizontal navigation bar
that always appears at the top of the web page when you page down.
(Note: you will need some length to your page for this to work).
- To achieve this create two <div> sections in the body of your document.
- The first section will contain the navigation bar.
- The second section will contain the heading, subheadings, and links with descriptions.
The CSS attributes you need for the navbar are overflow: hidden; position: fixed; top: 0; width: 100%;, but you also need to adjust the margins of the main part of the page to prevent it from disappearing behind the navbar.
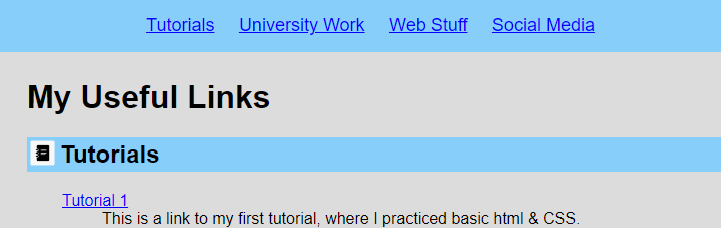
See Below for an example of the fixed Navigation Bar. Image 2 shows the fixed Navigation Bar when scrolling down the page.
Task 5 - Validate your code
- Use W3C Markup Validation Service to check if your code is correct before uploading it to the webserver. If it is not consult the validator's comments to correct your code. Keep checking until the code is 100% correct.
Task 6 - Upload your page to the Web server and set the correct permissions
- Connect to compute0.westminster.ac.uk using sftp using WinSCP, FileZilla, CyberDuck (or any other ftp tool you prefer).
- Upload your work to the webDev folder
- Check that your work is accessible online. The URL for the page will be https://wxxxxxxx.users.ecs.westminster.ac.uk/webDev/tutorial1.html where wxxxxxxx is your registration number.
Task 7 - Share your design with your peers and comment on other's work.
-
Let's become co-creators. Share your designs with the rest of the class and take the opportunity to exchange ideas and receive feedback. To do so go to the module Padlet, upload a screenshoot of your page, and provide the URL of the page from your Unix account.
Extra challenge:
- Update the document using the following HTML5
<nav> </nav>,
<header> </header>,
<footer> </footer>, and
<main> </main> tags:
-
<nav> </nav>: Wrap your navigation links in this tag. It's a neat way to tell browsers that these links are part of the navigation menu.
-
<header> </header>: Stick your introductory content in hereâlike logos, headings, or anything you want at the top of your page.
-
<footer> </footer>: The bottom of your page is the perfect home for this tag. Put your copyright info, contact details, or whatever you want to appear at the page's end here.
-
<main> </main> : This is where the bulk of your page's unique content should go.
- In case you worked with embedded style-sheets, copy all the CSS elements in a separate file and connect this file to your html page as external style-sheets.
- Modify the style-sheets using as selectors those HTML tags rather than creating classes or ids. The second completed example follows this structure.
Task 8 - Complete the Practice Test on Blackboard