Web Design and Development
Tutorial 5 - SVG
This is the fifth page of a full Portfolio. This Portfolio will help you prepare for the tutorial test that will count towards your final Coursework mark.
Task 1 - Create an SVG Interactive SVG Navigation
Use a text editor of your choice to create a new file. Save the file on your home h: drive as tutorial5.html
Important Notes: - No space in the filename
- File must have the .html extension
-
Use an embedded or external style sheet and do NOT use inline styles.
The form you will create should resemble Fig.1 below, indicating that you should aim to replicate a page that integrates a similar interactive SVG.
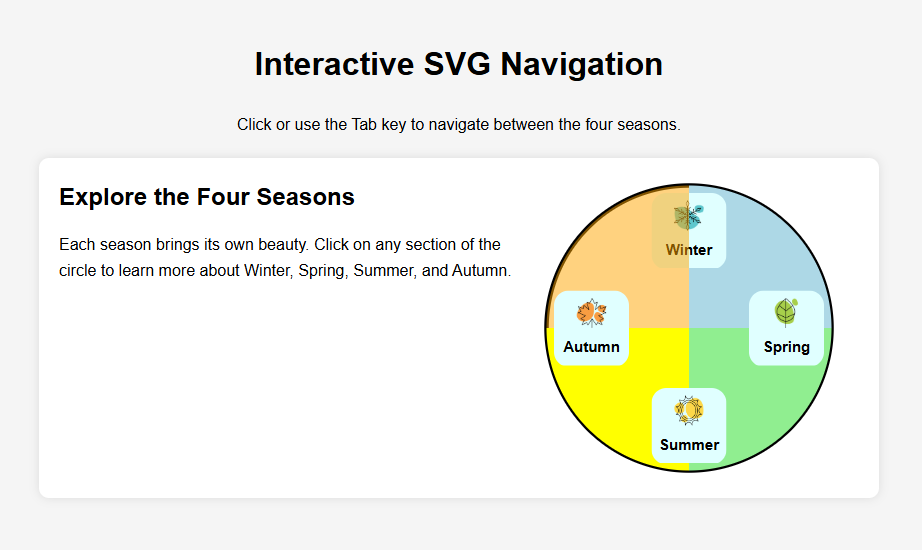 Fig.1 - A snapshot of an interactive SVG you want to achieve for this tutorial exercise.
To achieve this, follow the steps outlined below:
- Use appropriate HTML tags to establish the correct structure for an HTML document. Begin by defining the document as HTML and create the basic structure with a head and body.
- Create the appropriate head tags, Tutorial 5 for the title.
- Create a
<header> that contains a <h1> for the page title "Interactive SVG Navigation" and a paragraph <p> that provides a short description for the page. Close the <header>
- Create the
<main> area of the page that contains a <section> with a class name "seasons", containing:
- A heading
<h2> for the section.
- A paragraph
<p> with the text "Each season brings its own beauty. Click on any section of the circle to learn more about Winter, Spring, Summer, and Autumn."
- Within the
<section class="seasons"> create an <svg"> with <viewBox="0 0 200 200"">. Make sure you use accessibility tags like <aria-label> to describe the svg.
- Define an svg path with id named "quadrant" and dimentions
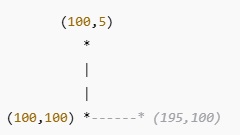
d="M 100 100 L 100 5 A 95 95 0 0 1 195 100 Z".
The path d="M 100 100 L 100 5 A 95 95 0 0 1 195 100 Z" defines a quarter-circle quadrant in SVG.
| Command |
Meaning |
M 100 100 |
Move To: Start at (100,100) (center of the circle) |
L 100 5 |
Line To: Draw a straight line upwards to (100,5) (top center of the quadrant) |
A 95 95 0 0 1 195 100 |
Arc To: Draw an arc from (100,5) to (195,100), forming a quarter-circle |
Z |
Close Path: Connects the last point (195,100) back to (100,100), forming a closed shape |
This path creates a quarter-circle (90-degree segment) starting from the center of the circle and moving to the top.
- Then create an svg
circle with center coordinates cx="100", cy="100" and radius r="95". Set up its propertries with fill="white", stroke="black" and stroke-width="3".
- Use the svg
<use> tag to reuse the path id="quadrant" and create the 4 quarters of the circle corresponding to the 4 seasons. The 4 quarters of the circle will have different transformation and fill, but they will share the same class name class="season-quadrant" and in this way we will be able to select them and create a CSS rule that applies to all of them.
- The first quarter of the circle corresponding to winter will have the following properties:
transform="rotate(0, 100, 100)"
fill="lightblue"
The second quarter of the circle corresponding to spring will have the following properties:
transform="rotate(90, 100, 100)"fill="lightgreen"
The third quarter of the circle corresponding to summer will have the following properties:
transform="rotate(180, 100, 100)" fill="yellow"
The fourth quarter of the circle corresponding to autumn will have the following properties:
transform="rotate(270, 100, 100)"fill="orange"
Each quadrant of the circle contains a thumbnail image and a title corresponding to each season. Starting from Winter, followed by Spring, Summer and Autumn going clockwise. To achieve this you need to introduce HTML elements within the svg. We use the foreignObject tag for something like this.
Followed each path you re-used with the use tag create a foreignObject tag. Each foreignObject will have, different coordinates:
foreignObject for winter will be x="75" y="10" width="50" height="50"foreignObject for spring will be x="140" y="75" width="50" height="50"foreignObject for summer will be x="75" y="140" width="50" height="50"foreignObject for autumn will be x="10" y="75" width="50" height="50"- followed by a
span with the text for the season name (Winter, Spring, Summer, Autumn).
Each foreignObject will be followed by a div class="season-label" containing:
- An image thumbnail for the season.
- Text for the season name (Winter, Spring, Summer, Autumn).
The images are provided in tutorial5_startup.zip.
Make each foreignObject a link to a web page for each coresponding season. Create relational links as if the html pages you call are structured in the same folder path with this tutorial exercise (the files are in the same folder).
Use the tabindex="0" attribute to control keyboard navigation by determining whether an element can receive focus when users press the Tab key.
Task 2 - Format the Interactive SVG
Use linked style sheet to further modify the HTML content to resemble the example layout of Fig.1 above.
Important Notes:
- Do NOT use inline styles unless you want to override a style you have defined as linked or embedded style.
Here is some help, use the following rule for some of the elements you have created:/* Seasons Section */
.seasons {
position: relative;
width: 800px;
margin-left: auto;
margin-right: auto;
padding: 20px;
height: 300px; /* Enough space for 200px SVG + 20px top/bottom padding */
background: white;
border-radius: 10px;
box-shadow: 0 0 10px rgba(0, 0, 0, 0.1);
}
.seasons svg {
width: 300px;
height: 300px;
}
/* Style the season labels inside foreignObject */
.season-label {
text-align: center;
font-size: 10px;
font-weight: bold;
background: lightcyan;
padding: 5px;
height: auto;
border-radius: 10px;
}
Task 3 - Validate your code
- Use W3C Markup Validation Service to check if your code is correct before uploading it to the webserver. If it is not consult the validator's comments to correct your code. Keep checking until the code is 100% correct.
Task 4 - Upload your page to the Web server and set the correct permissions
- Upload your work to the webDev folder
- Check that your work is accessible online. The URL for the page will be https://wxxxxxxx.users.ecs.westminster.ac.uk/webDev/tutorial1.html where wxxxxxxx is your registration number.
Task 5 - Share your design with your peers and comment on other's work.
-
Let's become co-creators. Share your designs with the rest of the class and take the opportunity to exchange ideas and receive feedback. Please go to the module Padlet, upload a screenshoot of your page, and provide the URL on the server.
Task 6 - Complete the Practice Test on Blackboard
Prepared by Daphne Economou.
Last modified, February 2025 by Daphne Economou
Accessibility statement