Web Design and Development
Tutorial 4 - Form
This is the fourth page of a full Portfolio. This Portfolio will help you prepare for the tutorial test that will count towards your final Coursework mark.
Task 1 - Create a form structure
Use a text editor of your choice to create a new file. Save the file on your home h: drive as tutorial4.html
Important Notes: - No space in the filename
- File must have the .html extension
-
Use an embedded or external style sheet and do NOT use inline styles.
The form you will create should resemble Fig.1 below, indicating that you should aim to replicate similar form elements. Not everyone needs to create a hotel reservation form; you have the flexibility to design other similar forms, such as:
- Course Registration
- Bank Account Registration
- Order Pizza
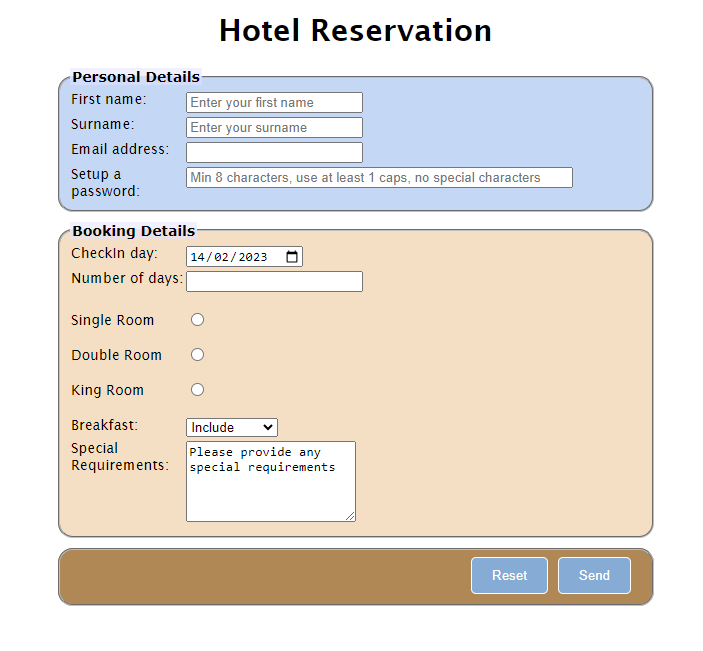 Fig.1 - A snapshot of the form layout you want to achieve for this tutorial exercise.
To achieve this, follow the steps outlined below:
- Use appropriate HTML tags to establish the correct structure for an HTML document. Begin by defining the document as HTML and create the basic structure with a head and body.
- Create the appropriate head tags, Tutorial 4 for the title.
- Before creating the form, include a heading that clearly states the purpose or type of form you are about to create.
- Structure the form in three areas:
- Personal Details
- Booking, Course Options, Bank Account Options, Pizza Order Options, depending on the type of form you create
- Reset and send buttons
- Group corresponding form elements in those areas as
<fieldset></fieldset>.
- Provide appropriate titles to those form areas/group of form elements using the
<legend></legend> HTML tag.
- Make sure that all the form elements you create have explict labels specified
<label></label>
- In HTML, you create explicit labels by making sure that the for attribute of a
<label> has the same value to the id attribute of the associated form element. This creates an explicit association between the label and the form element, improving accessibility and usability.
- Consider which form elements are essential. In HTML, you can specify that a form element is required by using the required attribute. The required attribute is applied to the form elements that must be filled out by the user before submitting the form.
- The last part of your form contains the form buttons. In HTML forms, you can use the
<input> element with the type attribute set to "reset" for the reset button and "submit" for the submit button.
- Create a ruler acting as a separator at the end of the document
- Your email address inside an address element
- The last modified date (just as hard coded date), use the
<sup></sup>HTML tag to create Superscript text formating.
The content of the page should look similar to Fig.2 below at this stage.
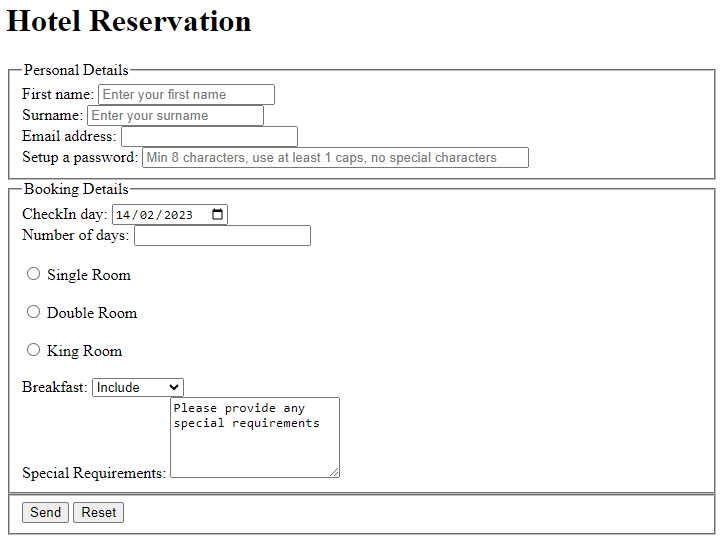 Fig.2 - A snapshot of the form layout without formatting.
Task 2 - Format the form
Use embedded style sheet to further modify the HTML content to resemble the example layout of Fig.1 above.
Important Notes:
- Use an embedded or external style sheet and do NOT use inline styles.
Task 3 - Validate your code
- Use W3C Markup Validation Service to check if your code is correct before uploading it to the webserver. If it is not consult the validator's comments to correct your code. Keep checking until the code is 100% correct.
Task 4 - Upload your page to the Web server and set the correct permissions
- Upload your work to the webDev folder
- Check that your work is accessible online. The URL for the page will be https://wxxxxxxx.users.ecs.westminster.ac.uk/webDev/tutorial1.html where wxxxxxxx is your registration number.
Task 5 - Share your design with your peers and comment on other's work.
-
Let's become co-creators. Share your designs with the rest of the class and take the opportunity to exchange ideas and receive feedback. Please go to the module Padlet, upload a screenshoot of your page, and provide the URL on the server.
Task 6 - Complete the Practice Test on Blackboard
Prepared by Daphne Economou.
Last modified, February 2025 by Daphne Economou
Accessibility statement