This is the second page of a full Portfolio that you will create and upload on the University Web Server. This Portfolio will help you prepare for the tutorial test that will count towards your final Coursework mark.
Task 1 - Create your Web Page content
Create a file and save it on your home h: drive as tutorial2.html
Important Notes:
No space in the filename
If you save your work outside of your h: drive, it will be deleted
Your Web Page should follow the following specifications:
Tutorial 2 for the title
Your Name in bold
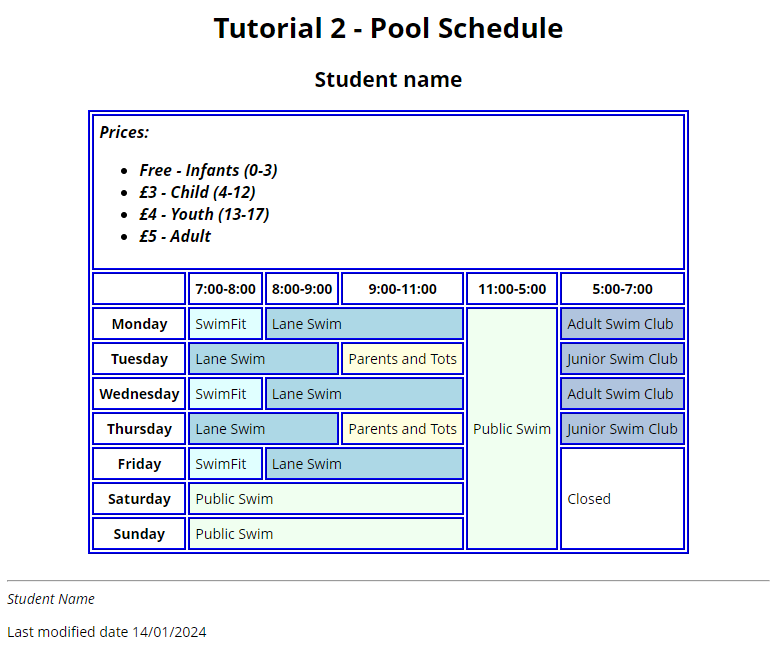
Create a table displaying the price list and schedule for the pool. Organize the layout using tables to achieve a format similar to Fig.1 below. Ensure the table has 9 rows to accommodate the content.
Within the first row of the table create a 'nested' list to outline the various price options. To ensure that special characters like the pound symbol (£) work consistently across different browsers when writing HTML, you should use the appropriate HTML entity code for the character. For the pound symbol, the HTML entity code is £. This code represents the pound sign and ensures proper rendering in all browsers.
Here's an example of how to use it in your HTML: <p>The price is £10.00 </p>
Proceed to the creation of the first row of the pool schedule. What type of cell it contains? Is it a normal table cell or a heading cell? Use the appropriate HTML tag <tr></tr> , <th></th> for the browser to format it correctly as emphasized. Consider als the text alignment.
Create the pool schedule. Use pen and paper to thoughtfully determine the required number of rows and columns. Consider the type of table cells and the span of each cell. Implement table cell attributes colspan="n" and rowspan="n" where needed. Certain rows and columns will be generated based on the specified values that particular table cells occupy. Be attentive to correct definitions, as inaccuracies can disrupt the table's appearance. If issues arise, you can easily recreate it by carefully considering the cell spans.
After the table content create a ruler acting as a separator after the table.
Provide your email address inside an address element.
Present the last modified date (just as hard coded date).
If you've reached this far, you should be proud of yourself for having worked that hard! You are not done though, you still need to style the page.
Task 2 - Format the table content
Format the text of the entire document as font-family: 'Open Sans', sans-serif; and font-size: 14px;
Make the text of the first table row that contains the prices for different ages groups to 16px, while the font style to italics and the font-weight to bold.
Change the table cells' background using the background-color: tag. Use the same background colour to identify slots that belong to the same category (SwimFit, Lane Swim, Parents and Tots etc.). Use CSS classes to create those.
Create some space between the text contained in the table cells and the table border by changing the td, th, padding: 5px;. Apply this declaration to both HTML table tags simultaneously.
Create a border for the table. The example in Fig.1 uses border: 2px ridge blue;. You can create any other border you like.
Center the heading and the table in the middle of the page, use margin-left: auto;, margin-right: auto;. Similarly you can centre the text in the heading table cells that contain the schedule dates and time slots.
See Below for an example of your page layout:
Fig.1 - A snapshot of the expected layout for tutorial 2.
Task 3 - Validate your code
Use W3C Markup Validation Service to check if your code is correct before uploading it to the webserver. If it is not consult the validator's comments to correct your code. Keep checking until the code is 100% correct.
Task 4 - Upload your page to the Web server and set the correct permissions
Connect to compute0.westminster.ac.uk using sftp using WinSCP, FileZilla, CyberDuck (or any other ftp tool you prefer).
Check that your public_html folder has been created for you.
If your folder is there, go inside that folder, and create a new folder for your Web Development work (You may for example call this folder webDev).
Check that your work is accessible online. The URL for the page will be https://wxxxxxxx.users.ecs.westminster.ac.uk/webDev/tutorial1.html where wxxxxxxx is your registration number.
Task 5 - Share your design with your peers and comment on other's work.
Let's become co-creators. Share your designs with the rest of the class and take the opportunity to exchange ideas and receive feedback. To do so go to the module Padlet, upload a screenshoot of your page, and provide the URL of the page from your Unix account.
Independent study
Extra challenge:
Now that you have completed your table, you validated it and you uploaded it to the web server save the file with a different name, like tutorial2B.html and improve its structure using table table grouping tags and its accessibility using table ARIA tags:
				<thead></thead>,
				<tbody></tbody>,
				<tfoot></tfoot>,
				aria-labelledby
				aria-describedby
				scope
.
Group <th> and <tr> tags into the <thead>
Group <tr><td> tags into the <tbody>
Group <tr><td> tags into the <tfoot>
Define the scope of header cells, columns and rows
Enhance the accessibility of the table by using the aria-labelledby and aria-describedby tags