This is the first page of a full Portfolio that you will create and upload on the University Web Server. This Portfolio will help you prepare for the tutorial test that will count towards your final Coursework mark.
Task 1 - Create your Web Page content
Download Tutorial1_startup.html, open it in the text editor of your choice, and in a browser. Notice that the browser does not recognise the documents structure. Save the file on your home h: drive as tutorial1.html
Important Notes:
No space in the filename
If you save your work outside of your h: drive, it will be deleted
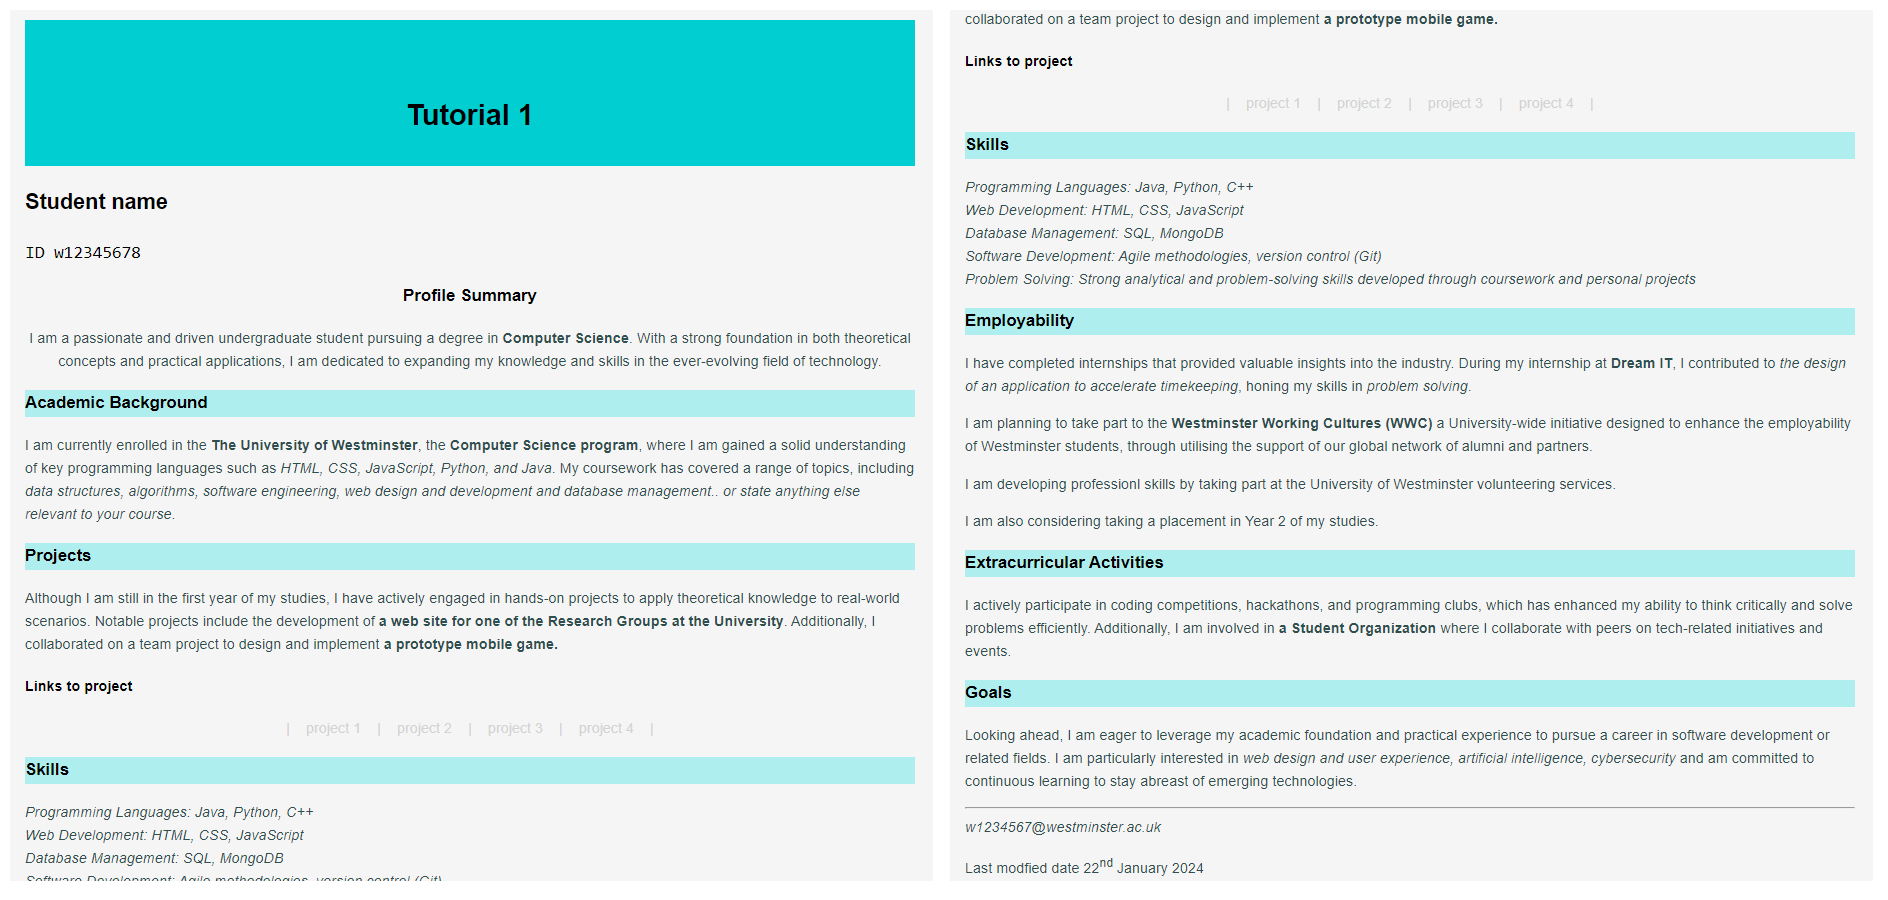
The web page you create should resemble Fig. 1 below. To achieve this, follow the steps outlined below:
Use appropriate HTML tags to establish the correct structure for an HTML document. Begin by defining the document as HTML and create the basic structure with a head and body. Ensure that the text intended for formatting is placed within the body of the document <body></body> tag.
Create the appropriate html tags
<html lang="en">, specify the correct head tags, <meta charset="UTF-8">, and <title></title>.
The document title should be "Tutorial 1".
Adjust the text to incorporate your personal details, including your name and student ID, and update the content under the provided headings. Utilize suitable HTML tags to organize the content with headings and paragraphs, aiming for a layout similar to that depicted in Fig. 1. While it may not be an exact match, strive for a similar appearance. Consider when you need to use block and inline tags.
Use 3 headings.
Create at least 3 different HTML formating tags to styles the text content.
Use embedded style sheet to further modify the HTML content. Specifically, set the following:
document background colour to background-color: WhiteSmoke;, or specify a colour you prefer
document text to font-family: 'Arial', sans-serif;
text margin to margin: 20px;
h1 padding: 80px 0;height: 2px; to create the wide Turquoise box around the heading, and background-color: DarkTurquoise;, or specify a colour or width of your choice for the heading box
h3 background colour PaleTurquoise, while the <p></p>, and <address></address> text colour to color: DarkSlateGrey;, or specify a colour you prefer
the first heading, 'Profile Summary,' and the corresponding paragraph should be centered on the page. Utilize a CSS class to target the appropriate heading and paragraph tag attributes.
the provisional text where in the future you could create links to real projects of your portfolio should appear as color: lightgray; indicating that the links are inactive. Use CSS style ID to do this
in the project links area to create the empty space between the projects use the following special characters |
Create a ruler acting as a separator at the end of the document
Your email address inside an address element
The last modified date (just as hard coded date), use the <sup></sup>HTML tag to create Superscript text formating.
Important Notes: No space in the filename. If you save your work outside of your h: drive, it will be deleted. So save it on your h: drive and transfer it to your web server account. Follow the steps below.
Fig.1 - A snapshot of the expected layout for tutorial 1.
Task 2 - Validate your code
Use W3C Markup Validation Service to check if your code is correct before uploading it to the webserver. If it is not consult the validator's comments to correct your code. Keep checking until the code is 100% correct.
Task 3 - Upload your page to the Web server and set the correct permissions
Connect to compute0.westminster.ac.uk using sftp using WinSCP, FileZilla, CyberDuck (or any other ftp tool you prefer).
Check that your public_html folder has been created for you.
If your folder is there, go inside that folder, and create a new folder for your Web Development work (You may for example call this folder webDev).
If your folder is not there, you will carry out the following tasks of uploading your file to the Web Server next week. Just make sure that your work is saved in your h: drive, and you may also save it on a memory stick for extra safety. Please also log an IT Ticket (Log a Call) using the online Service Desk.
Upload your work to the webDev folder
Check that your work is accessible online. The URL for the page will be https://wxxxxxxx.users.ecs.westminster.ac.uk/webDev/tutorial1.html where wxxxxxxx is your registration number.
Task 4 - Share your design with your peers and comment on other's work.
Let's become co-creators. Share your designs with the rest of the class and take the opportunity to exchange ideas and receive feedback. To do so go to the module Padlet, upload a screenshoot of your page, and provide the URL of the page from your Unix account.
Independent study
Extra challenge:
Now that you have completed the page, you validated it and you uploaded it to the web server save the file with a different name, like tutorial1B.html and reorganize it using the following html tags:
				<header></header>,
				<footer></footer>,
				<main></main>,
				<section></section>
.
Integrate <h1> into the <header>:
Move the <h1> element into a <header> tag at the top of the document.
The <header> will represent the introductory section of the page.
Place the last paragraph and email inside the <footer>:
Create a <footer> tag at the bottom of the document.
Move the last paragraph and the email address into the <footer>. This will represent the closing section of the page.
Organize the main content with <main> and <section>:
Wrap all primary content (instructions, steps, etc.) within a <main> tag.
Divide the content into logical sections using <section> tags to improve semantic structure.
Make the <footer> stick to the bottom and span the full width:
Use CSS to position the <footer> at the bottom of the page and ensure it spans the entire width of the browser window. Add a solid background color to distinguish it visually.
Task 5 - Complete the Practice Test on Blackboard
After you have completed the tutorial and your independent study Go to Assessment -> Practice Tests -> Week 1 Practice Test and complete the test. You can have up to five attempts to get the maximum score of 2 marks.
Prepared by Anne-Gaelle Colom, 2019.
Last modified, January 2025 by Daphne Economou